How to Access and Control Your Raven Modem via TCP/IP
by Gary Roberts | Updated: 12/09/2015 | Comments: 1
Blog Topics
Area / Application


Product Category


Corporate / News
Search the Blog
Subscribe to the Blog
Set up your preferences for receiving email notifications when new blog articles are posted that match your areas of interest.
Suggest an Article
Is there a topic you would like to learn more about? Let us know. Please be as specific as possible.
Have you ever wanted the ability to control your Raven cellular modem with your data logger? Would it be nice to be able to get data on the health of your cellular modem and its data network? Maybe you even want to reset your Raven modem. What if I told you that it’s quite easy to do all of this using the CRBasic programming language? In this article, I’ll share with you the experience I had trying this out and show you how you can do it too.
First, a Manual Attempt
While doing some research for a customer, I came across some interesting information in the Raven XT manual. The manual stated that the Raven modem could be driven with AT commands via a terminal program over TCP/IP. These AT commands are a set of instructions used to control, dial, and configure the modem.
|
Recommended for You: You can find AT commands listed in the “Supported AT Command Reference” document from Sierra Wireless. For an updated list of the AT commands with their settings, check the web admin interface provided by Sierra Wireless for your modem. |
Based on this information, I decided to try using these commands in LoggerNet’s Device Configuration Utility (DevConfig) to check the current modem settings, change the settings, and direct the modem to do various activities.
Here are the steps I took if you want to try this too:
- Using DevConfig, select Unknown from the Device Type list.
- Select the Use IP Connection checkbox.
- In the Communication Port field, enter the IP address or DNS name of the Raven modem, followed by the default terminal port number of “2332.”
Tip: For more information, see the “Configuring the Raven for Dynamic IP” section of your Raven modem manual. - Click the Connect button.
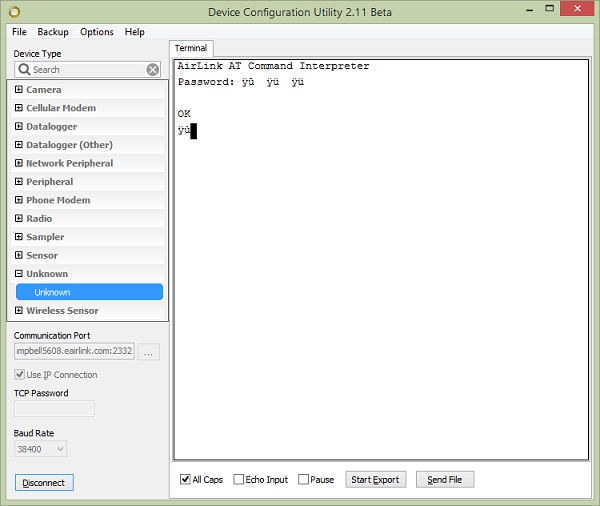
- After the modem returns a prompt asking for a password, enter the administrative password you previously set up in your modem (default: 12345).
- Click the Enter button on your keyboard.
- The modem returns “OK,” and your terminal window should look similar to this:
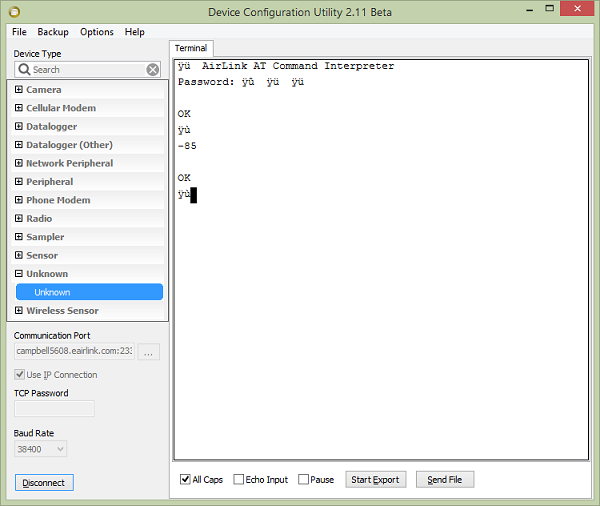
- Enter “AT*NETRSSI?” so the modem returns its current RSSI (received signal strength indicator) value. The RSSI value is how well the modem is “hearing” the cell tower it is connected to.
Tip: The RSSI value is a useful value when troubleshooting cell modem issues. - The modem returns a value between -125 and -25, depending on how well the modem can “hear” the tower, followed by “OK.” In the image below, the modem returned “-85”:
By following these steps, I knew that I could get valuable, real-time information from my modem. If it worked doing it by hand using a terminal program, surely a CRBasic data logger could get the same data, as well as store the data for me for later use and analysis, right?
Next, a Programmatic Attempt
For my CRBasic data logger to use TCP/IP to “talk” to my Raven modem as my terminal program does, I needed to have both the modem and the data logger configured for Point-to-Point Protocol (PPP). To do this, follow the instructions in your Raven modem manual. You can find the instructions in the appendix for configuring the modem for PPP.
I started writing my CRBasic program as I normally would. I used the basic template generated by the CRBasic Editor and added a set of variables for storing modem information (including RSSI).
Note: The modem you are using might have more or different variables that could be queried, but the list below shows the variables that I wanted to keep track of.
'Public variables used to store information we receive from the Raven modem
Public current_day_usage As Long
	Units current_day_usage = kB
Public current_month_usage As Long
	Units current_month_usage = kB
Public current_week_usage As Long
	Units current_week_usage = kB
Public network_operator As String
Public network_service_type As String
Public network_state As String * 50
Public previous_day_usage As Long
	Units previous_day_usage = kB
Public previous_month_usage As Long
	Units previous_month_usage = kB
Public previous_week_usage As Long
	Units previous_week_usage = kB
Public raven_date_time As String
Public raven_device_port As Long
Public raven_domain As String
Public raven_esn As String
Public raven_ip_address As String
Dim dns_ip_address As String
Public raven_phone_number As String
Public raven_mac_address As String
Public raven_modem_name As String
Public raven_serial_port_configuration As String
Public raven_serial_port_mode As String
Public raven_voltage
	Units raven_voltage = volts
Public rssi
After the data from the modem is returned, you need to parse through it. To hold the information for parsing, you need to create some temporary string variables and a TCP/IP socket. Here’s how I did it:
Public socket(2) As Long
Public units_on_usage_data As String
'variables used to parse the strings returned by the Raven modem.
Const CRLF = CHR(13) & CHR(10)
Dim returned_value As String * 70 'Temp string to hold the values returned by the modem
Dim string_location
In one of the slow sequence scans of my program, I opened a TCP/IP socket to port 2332 on my Raven modem. You can do this using the TCPOpen() instruction in CRBasic to connect to your Raven modem’s internal (behind its firewall) default TCP/IP address of 192.168.13.31. This creates a comport parameter that you can use later in the program, instead of specifying a communications port.
Tip: Use the TCPOpen() instruction in a slow sequence just in case something goes wrong and the connections fails. That way, your other critical measurements won’t be held up.
socket(1) = TCPOpen("192.168.13.31", 2332, 100)
After I knew that I had a good socket connection (that is, the socket reported a value greater than 100), I tried to log in to the modem’s terminal. You can do this using the SerialOut() instruction with the TCP/IP socket that you just created as the comport parameter.
If(socket(1) > 0) Then
	SerialOut(socket(1), "" , "Password", 1, 200) 'Wait for the Password prompt before sending the password.
The data logger waits for the word “Password” before it moves on to the next instruction (or it times out).
SerialOut(socket(1), "12345" & CRLF, "OK", 1, 200) 'Send the password and wait for the OK to move on.
After the data logger successfully “sees” the word “Password,” it sends the password “12345” followed by a carriage return and a line feed (the equivalent of you clicking the Enter button on your keyboard). The data logger then waits for “OK” before moving to the next CRBasic instruction.
You can use the SerialFlush() instruction to clear out your data logger’s serial buffer. (I did this so that I knew that I was working with a clean buffer, clear of surprises that could mess up my running CRBasic code.) The data logger then sends the “AT*NETRSSI?” AT command to the modem (followed by a carriage return and line feed)—just like when you used your terminal program in DevConfig.
	SerialFlush(socket(1))
	SerialOut(socket(1), "AT*NETRSSI?" & CRLF, CRLF, 1, 200) 'Query for Signal Strength (RSSI).
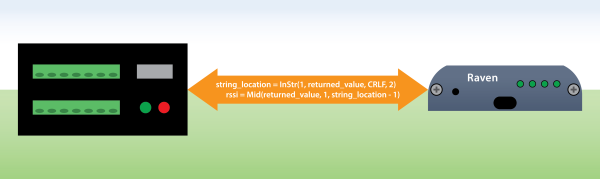
The data logger then looks at the string returned to it by the modem, searching for the first carriage return and line feed. After the data logger has the location of the carriage return and line feed in the string “returned_value,” it uses this location to copy everything in front of the carriage return and line feed to the “rssi” variable, which is also a string.
	SerialIn(returned_value, socket(1), 100, 0, 1000)
	string_location = InStr(1, returned_value, CRLF, 2)
	rssi = Mid(returned_value, 1, string_location - 1)
Your data logger now has the current RSSI value of your Raven modem and can store this information, manipulate it, email it to you, etc. That was pretty easy to get the information from your modem, wasn’t it?
When you’re finished getting the data that you need, you can use the TCPClose() instruction to have your data logger close the IP socket to your Raven modem.
TCPClose(socket(1))
Manipulate and Control Your Modem
Now that you’ve used your data logger to get data from your modem, you’re ready to learn how to manipulate and control your modem. In the code example below, you can see how to reset or restart your modem every hour at the top of the hour. The data logger then goes through the same login process that it did in the example we just went through. When it has successfully logged in, it sends the AT command “ATZ” to the modem.
If(IfTime(0, 1, hr)) Then
	socket(2) = TCPOpen("192.168.13.31", 2332, 100)

        SerialOut(socket(2), "" , "Password", 1, 200) 'Wait for the Password prompt before sending the password.
        SerialOut(socket(2), "12345" & CRLF, "OK", 1, 200) 'Send the password and wait for the OK to move on.

        If(socket(2) > 0) Then
		SerialFlush(socket)
		SerialOut(socket, "ATZ" & CRLF, CRLF, 1, 200) 'Reset/reboot the raven modem
        EndIf

        If(TCPClose(socket(2)) = 2) Then socket(2) = -1
EndIf
Tip: Rebooting is a nice command to have in your program, as there are times when the modem connection to the cellular network gets stale. A restart refreshes everything and gets this working again.
More Information
For a full example of this program, which includes getting other data items from a Raven modem, download the Raven-Status.dld file.
I hope you found this information useful. If you have any questions, clarifications, or enhancements, please post them below.


About the Author
 Gary Roberts is the Product Manager over communications and software products at Campbell Scientific, Inc. He spends his days researching new technology, turning solutions to problems into stellar products, doing second-tier support, or geeking out on Campbell Scientific gear. Gary's education and background are in Information Technology and Computer Science. When he's not at work, he is out enjoying the great outdoors with his Scouts, fighting fire/EMS, working amateur radio, or programming computers.
Comments
lucas z. | 05/30/2018 at 01:07 PM
Hello, I realize this post is now a few years old, but I would like to use similar code to communicate with a newer RV50 model through the RS-232 port (serial) on the datalogger instead of an IP connection. I would like to code this information to transmit daily from the logger and reset the modem. Can you offer any guidance on configuring the SerialOpen and delay times? The code I have doesnt seem to work at this time. Thanks for any help!
Please log in or register to comment.